Installer et configurer Azure AD Connect
Dans cet exemple, je vais installer Azure AD Connect sur un serveur Windows 2022 et utiliser le type d’installation rapide.
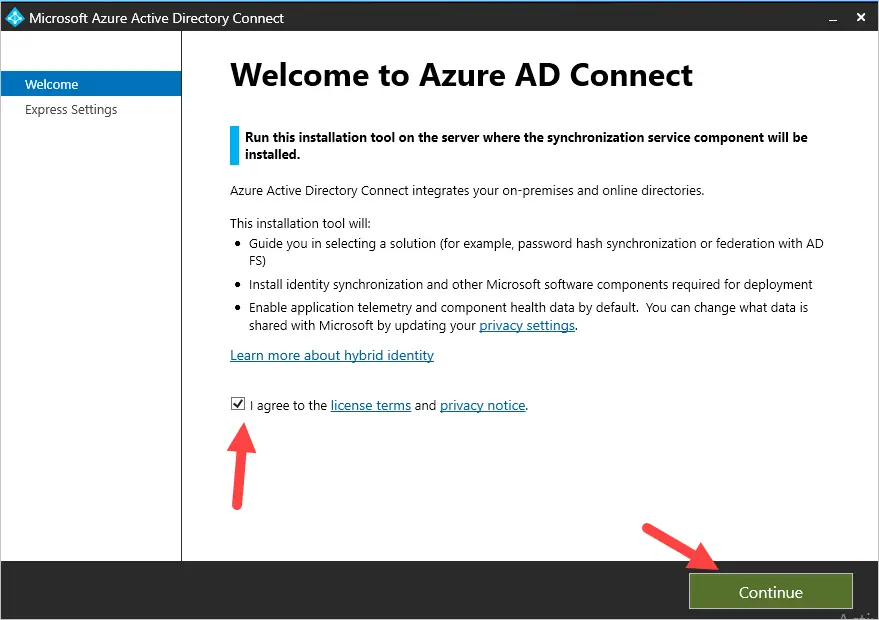
Étape 1. Démarrer l’installation d’Azure AD Connect
Ouvrez le fichier Azure MSI que vous avez téléchargé.
Acceptez les conditions et cliquez sur continuer.
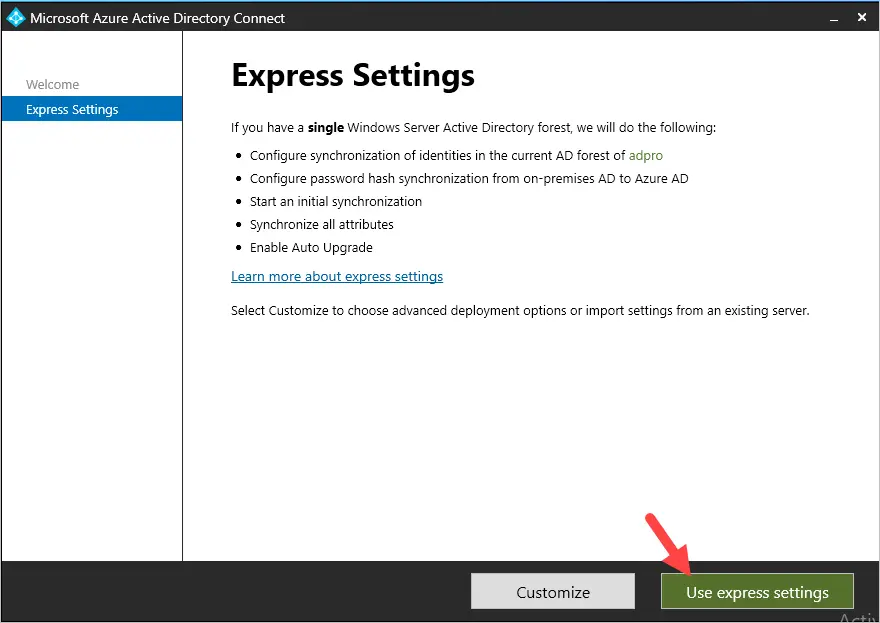
Étape 2. Choisissez le type d’installation
Par défaut, il s’agira d’express, si vous avez besoin d’utiliser l’installation personnalisée, cliquez sur le bouton de personnalisation. Dans cet exemple, j’utiliserai l’installation express.
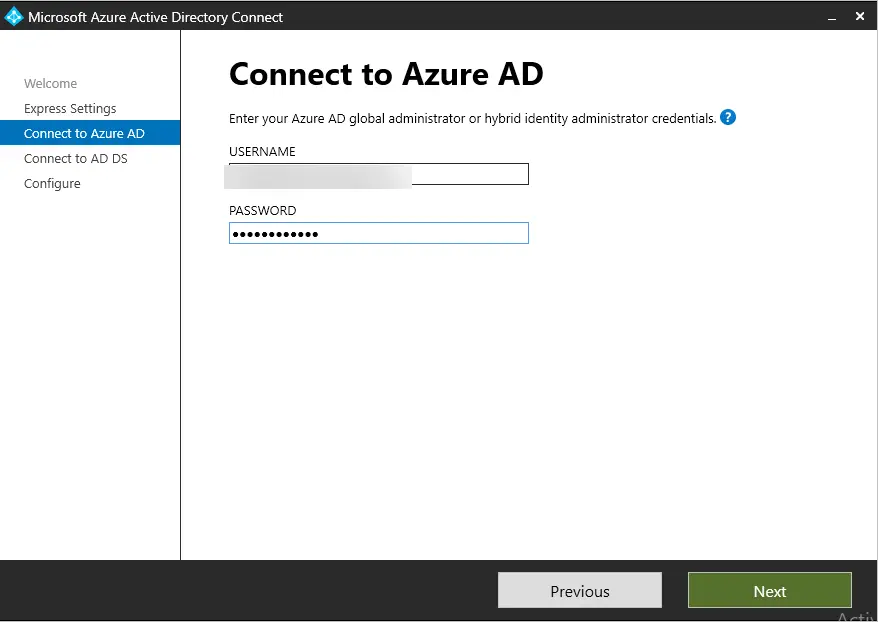
Étape 3. Se connecter à Azure ADConnection to Azure ADConnection
Entrez le nom d’utilisateur et le mot de passe de l’administrateur général Azure AD.
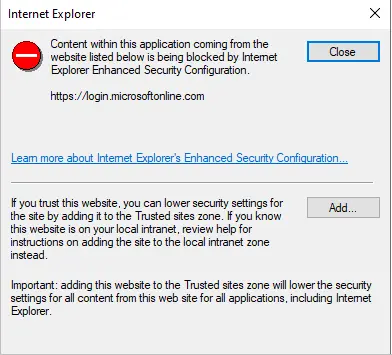
You might get multiple errors like below. You will need to add the URLs to the trusted site zone by clicking the add button. I got this popup 3 times for 3 different URLs, once added I got the Microsoft logon box.
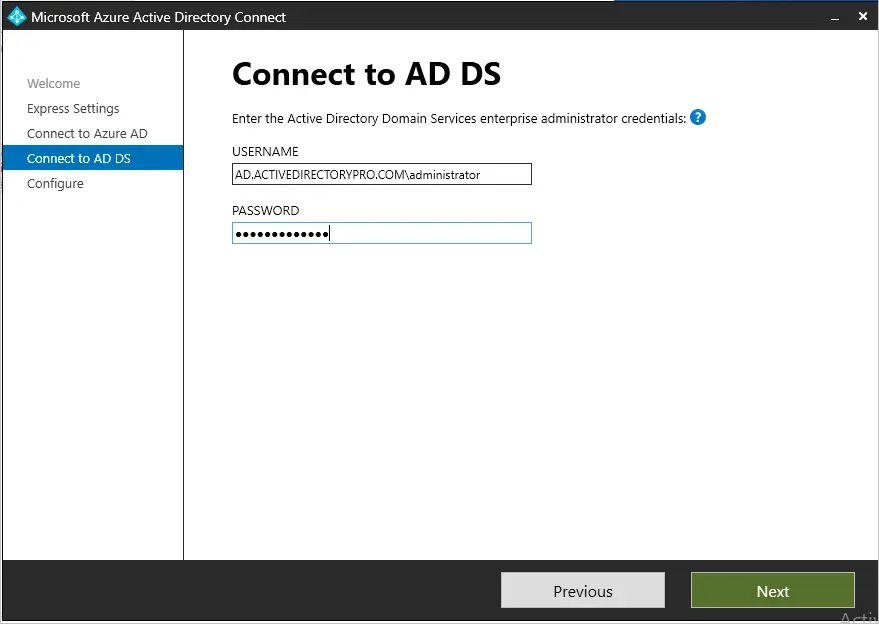
Step 4. Connect to AD DS (on-premises Active Directory)
Now you will enter the credentials of an enterprise administrator account for your on-premises Active Directory. These credentials are used to create the local Active Directory account that is used for synchronization.
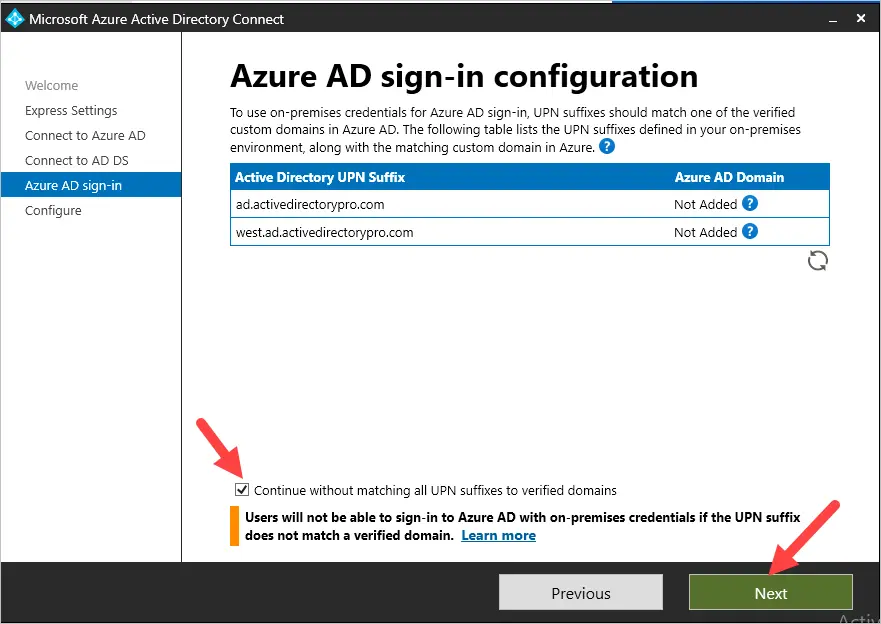
Step 5. Azure AD sign-in configuration
The screen is showing you the UPN suffixes it detected in your local Active Directory. It is common to have multiple UPN suffixes. If you want to use single sign on you need to have a UPN suffix that matches your verified domain in Microsoft 365. For example, my domain is activedirectorypro.com, this domain is verified in the 365 tenant.
But the install does not detect a matching UPN suffix. I’ll select “Continue without matching all UPN suffixes to verified domains” and fix this later.
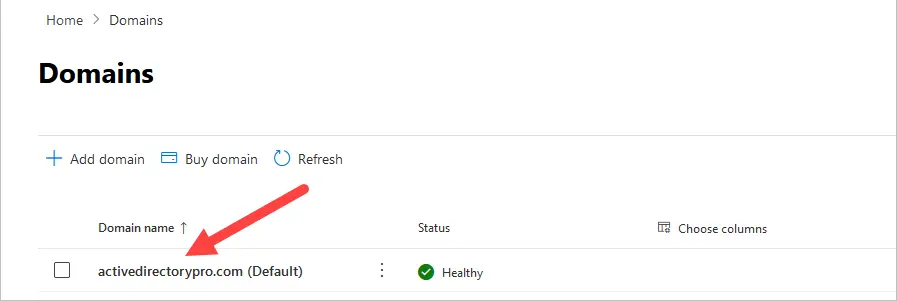
The screenshot below shows my verified domain in the 365 admin center.
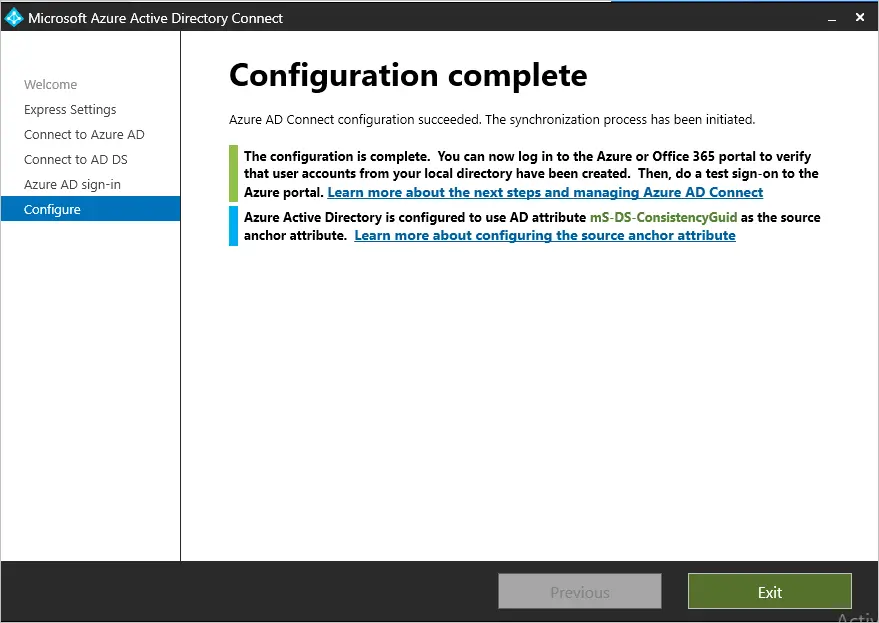
Step 6. Ready to configure
This last step will actually install the Azure AD Connect tool and configure it using the provided settings.
Tip: If you don’t want to sync all OUs, then uncheck “Start the synchronization process when configuration completes”. If you keep this option checked it will sync all objects from your on-premises Active Directory. You can change this later but it will take additional steps to remove the synced objects from Azure. I cover this later in this guide.
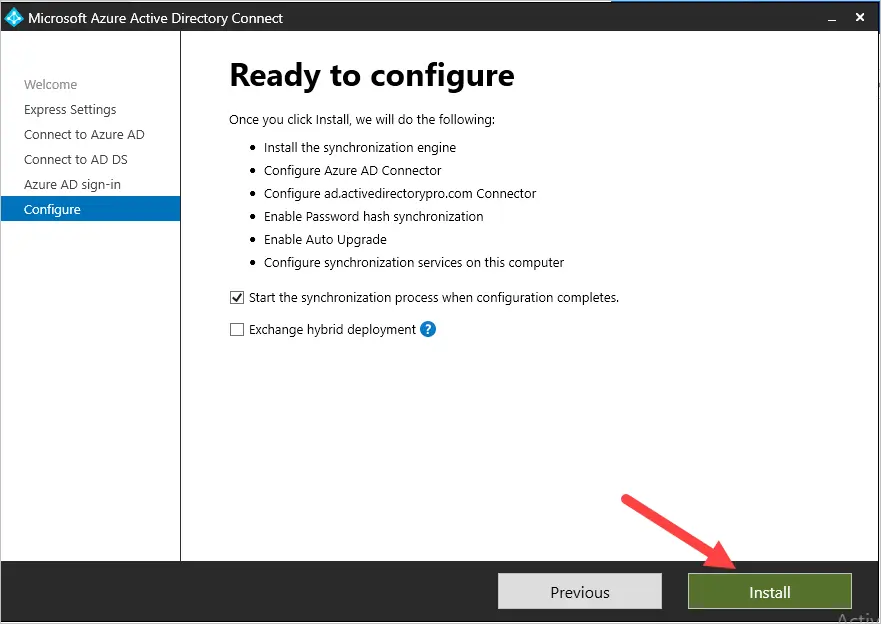
The installation can take several minutes to complete.
If you get a message that says “The Active Directory Recycle Bin is not enabled for your forest” then I highly recommend you enable it. See my article enable ad recycle bin for step by step instructions.
How to Check Azure AD Connect Sync Status
You can view the sync status by logging into the Microsoft 365 Admin Center and viewing the Azure AD Connect dashboard.
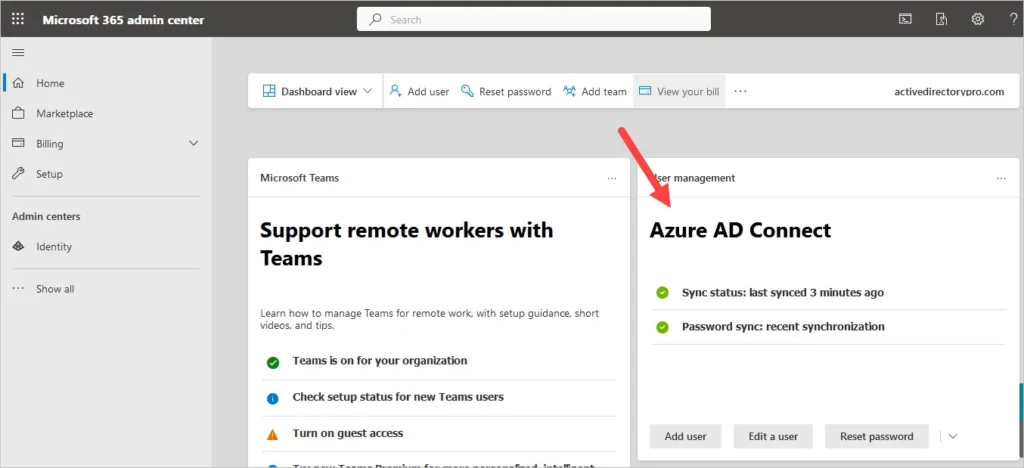
You can click on sync status to get more details.
Check Azure ad connect sync status using Powershell
To check the sync status with Powershell you can use the following command. This requires the MSOnline module to be installed.
Get-MsolCompanyInformation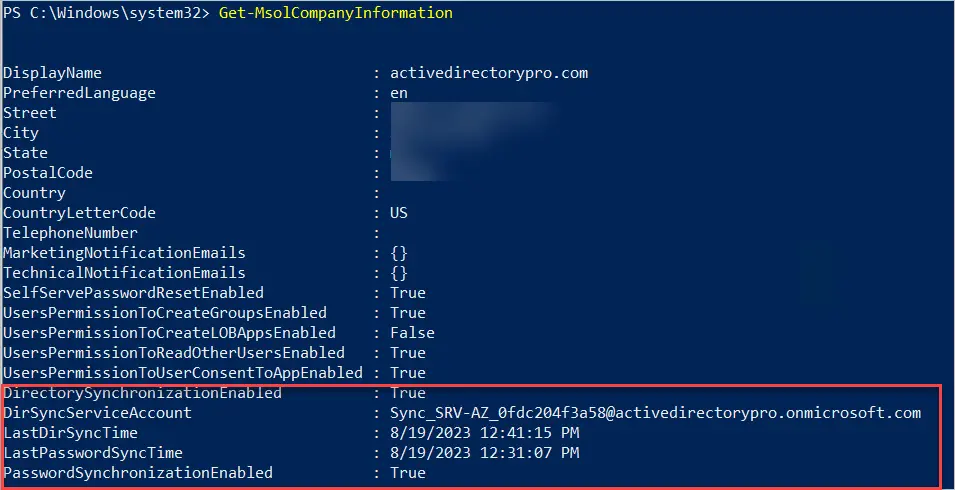
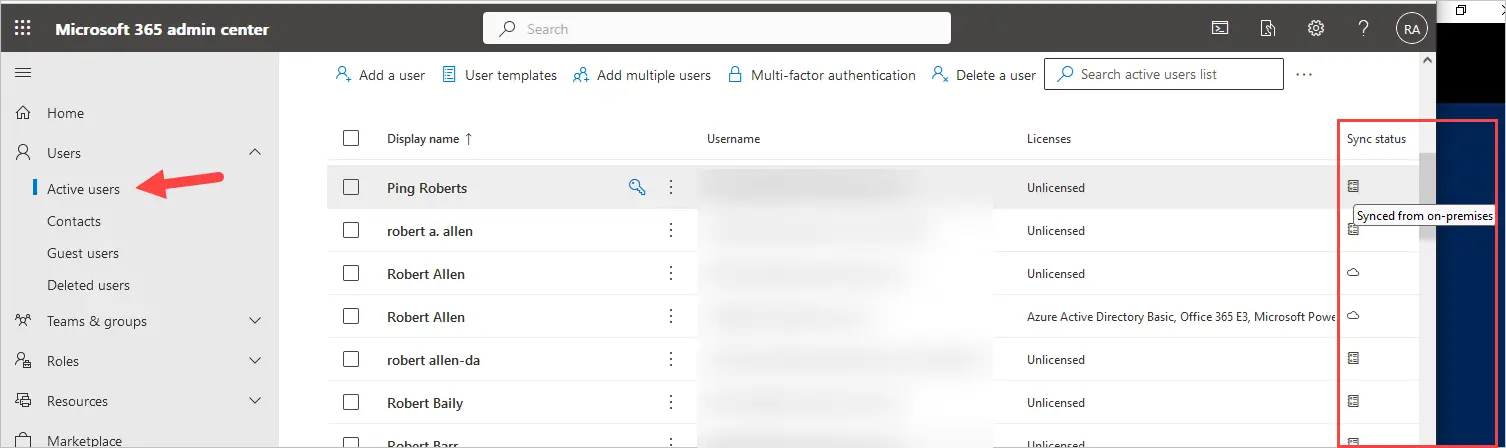
Check Synced Users in the 365 Admin Center
You can also verify users are being synced in Azure by clicking on Users -> Active Users. Add the Sync status column and it will show you if the user is synced from on-premises or is a cloud only user.
Exclude Users from Azure AD Connect Sync
What if you have users or groups that you don’t want to sync to the Azure cloud?
The easiest option is to use the Azure AD connect domain and OU filtering. If you need more advanced options such as excluding users based on an attribute you can use the synchronization rules editor.
The following steps will walk through excluding an OU from syncing.
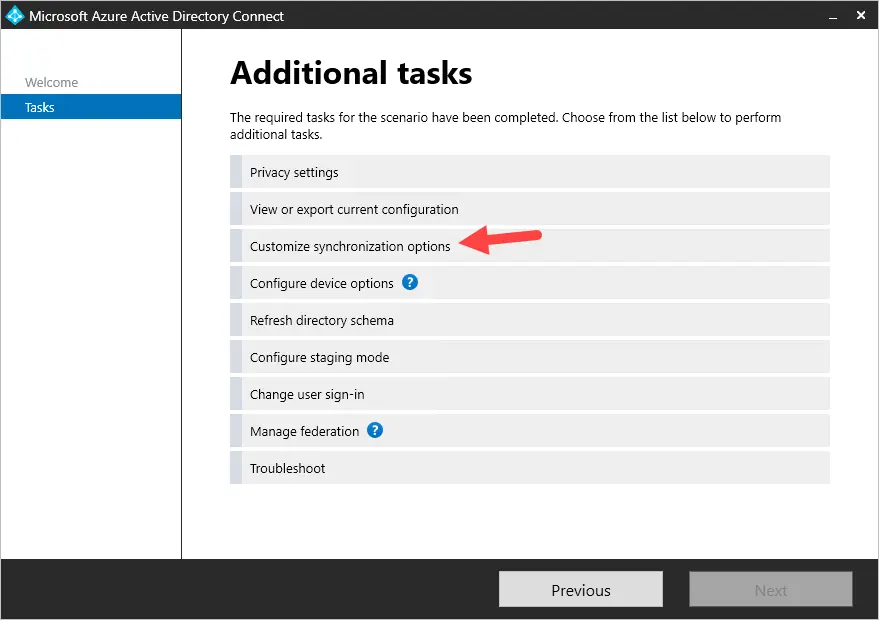
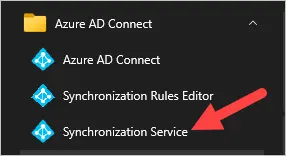
1. Open Azure AD Connect.
2. Click Configure
3. Click Customize synchronization options and click next
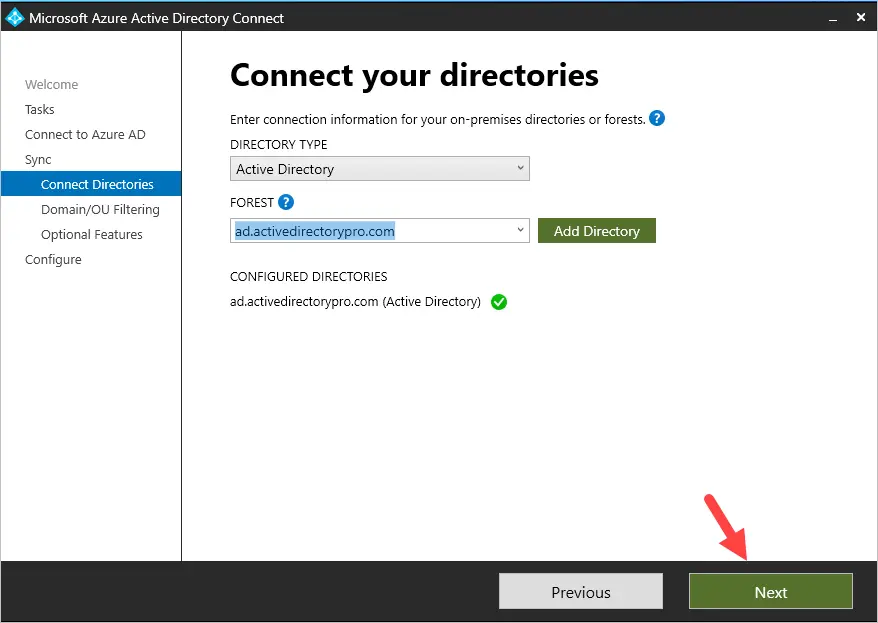
4. Enter your Azure AD global administrator credentials.
5. Select your forest, it should already be selected, and click next.
6. Select “Sync selected domains and OUs”.
Next, uncheck any domains or OUs you want to exclude from syncing to Azure.
In this example, I’m going to uncheck my west.ad.activedirectorypro.com domain. This domain was for testing only and does not need to be synced. Under my ad.activedirectorypro.com domain I’m going to uncheck my test OUs. These OUs are test accounts that do not need to be synced.

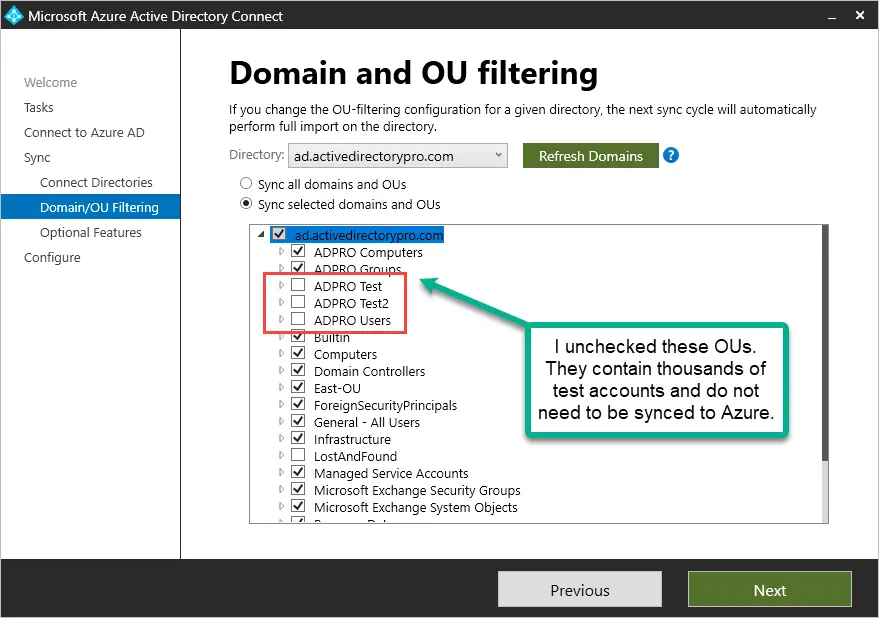
When you are done click the next button.
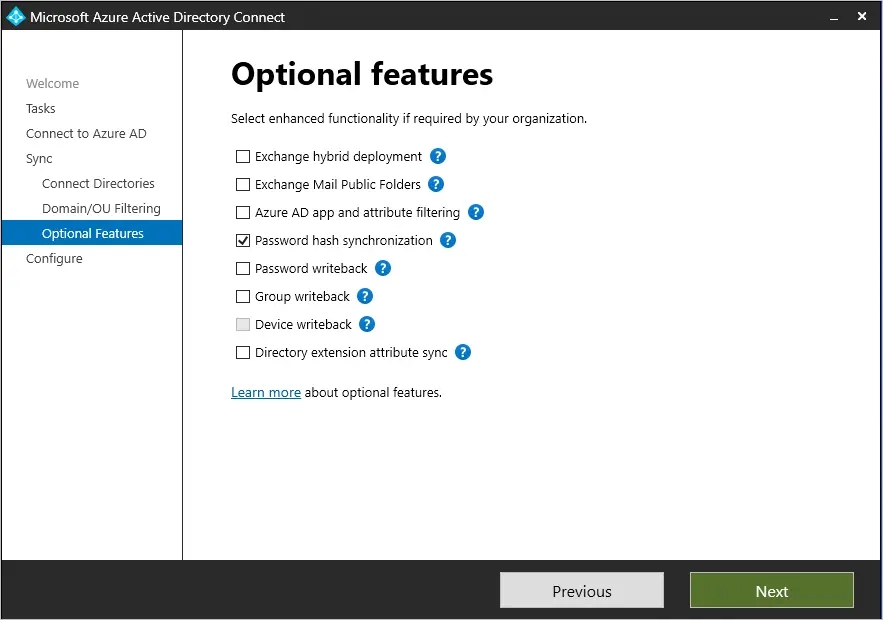
7. On the option features page leave the default options selected and click next.
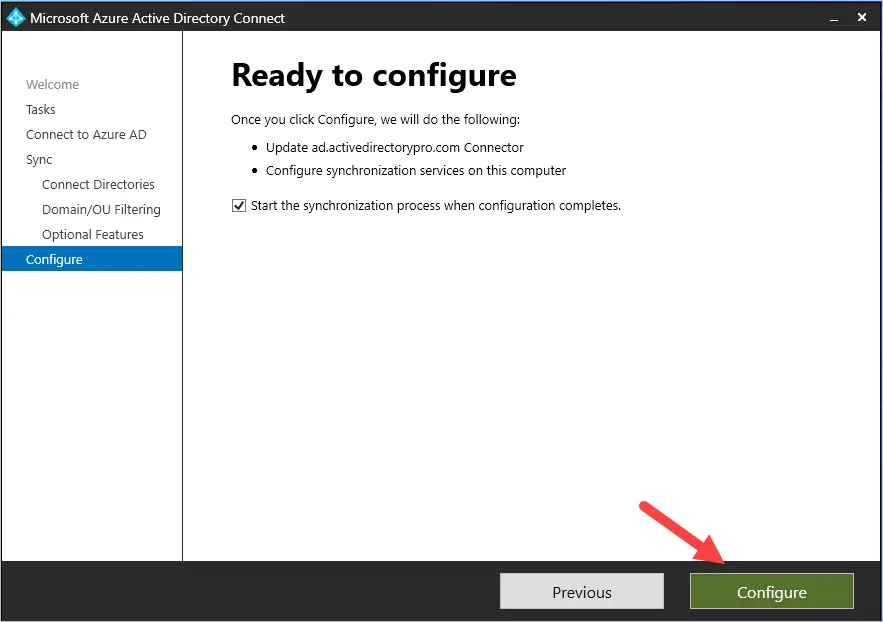
On the ready to configure screen click configure.
What happens to accounts in Azure if they are already synced?
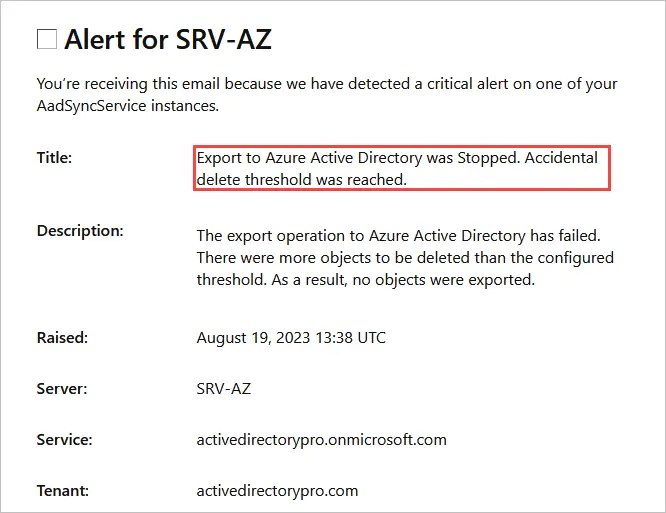
If accounts have been synced to Azure and you then exclude them they will be deleted from Azure. In this guide, I initially synced my entire domain (over 8,000 accounts) to Azure. I then excluded several OUs that had around 5,000 accounts. When I exclude these OUs and user accounts they will be deleted from Azure. By default, there is a threshold of 500 accidental deletes. See the steps below for more details.
After I excluded over 5,000 users from Azure AD Connect, I got the following email alert.
If you want to continue with removing the accounts follow these steps.
1. Disable the Azure AD Connect sync deletion threshold with the following command.
Disable-ADSyncExportDeletionThreshold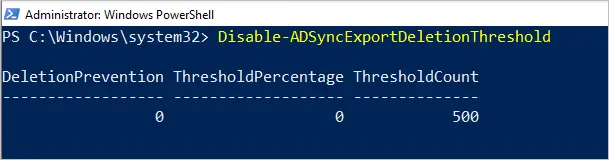
2. Force start Azure AD Connect Sync
Use the following command to start the sync process.
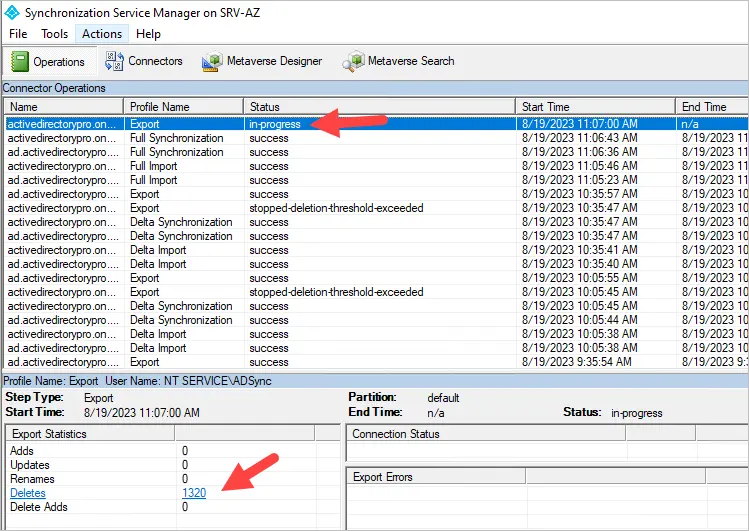
Start-ADSyncSyncCycle -PolicyType Initial3. Check the synchronization service status
Open the Synchronization service tool.
Look for export in the profile name. Click on it and view the export statistics and status. Mine is showing in-progress with 1320 deletes.
Le processus de suppression peut prendre un certain temps si vous avez beaucoup de comptes. Vous pouvez également recevoir une notification par e-mail indiquant que le seuil de suppression a été résolu.

4. Lorsque vous avez terminé de supprimer les comptes, redéfinissez le seuil à 500 objets.
Enable-ADSyncExportDeletionThreshold -DeletionThreshold 50Pour plus d’informations, reportez-vous à l’article Azure AD Connect Sync : Empêcher les suppressions accidentelles.
Dépannage
Lorsqu’il s’agit de synchroniser vos utilisateurs locaux avec Azure, il peut y avoir toutes sortes de problèmes différents. Vous trouverez ci-dessous quelques options pour vous aider à résoudre les problèmes et à obtenir plus de détails sur les problèmes que vous pourriez rencontrer.
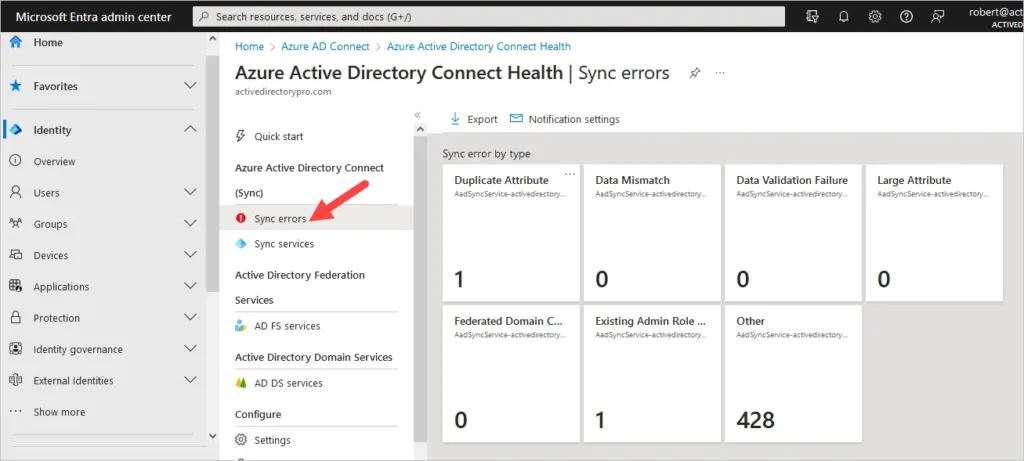
1. Azure Active Directory Connect Health
Dans Azure, vous pouvez rechercher les erreurs de synchronisation à l’aide de l’outil Azure Health Connect.
2. Résolution des problèmes liés à Azure AD Connect
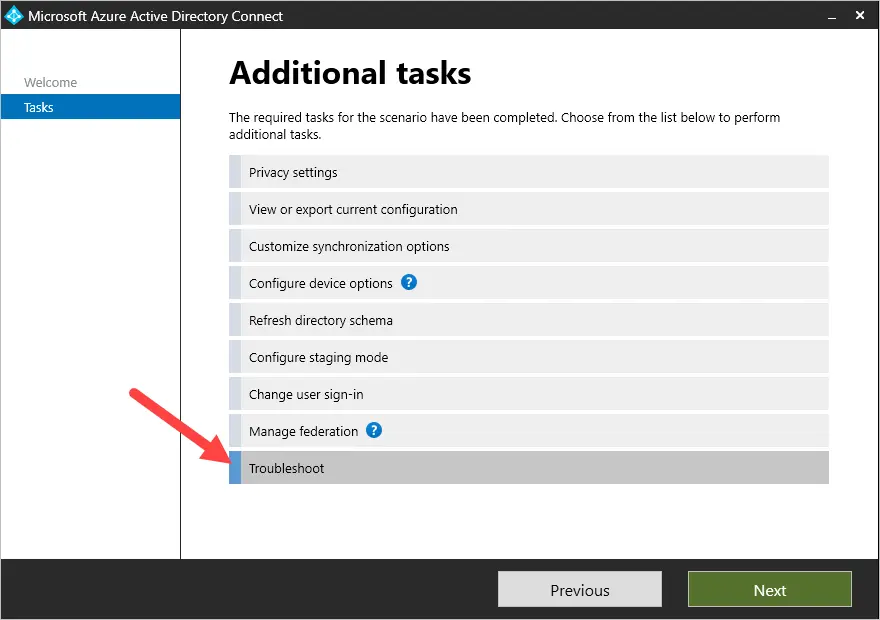
L’assistant de dépannage peut vous aider dans les domaines suivants :
https://learn.microsoft.com/en-us/azure/active-directory/hybrid/connect/tshoot-connect-objectsync#troubleshooting-task
- Détectez l’incompatibilité du nom d’utilisateur principal (UPN) si l’objet est synchronisé avec Azure AD.
- Vérifiez si l’objet est filtré en raison du filtrage de domaine.
- Vérifiez si l’objet est filtré en raison du filtrage de l’unité d’organisation (UO).
- Vérifiez si la synchronisation des objets est bloquée en raison d’une boîte aux lettres liée.
- Vérifiez si l’objet se trouve dans un groupe de distribution dynamique qui n’est pas destiné à être synchronisé.
Vous serez invité à indiquer les étapes de dépannage que vous souhaitez effectuer.
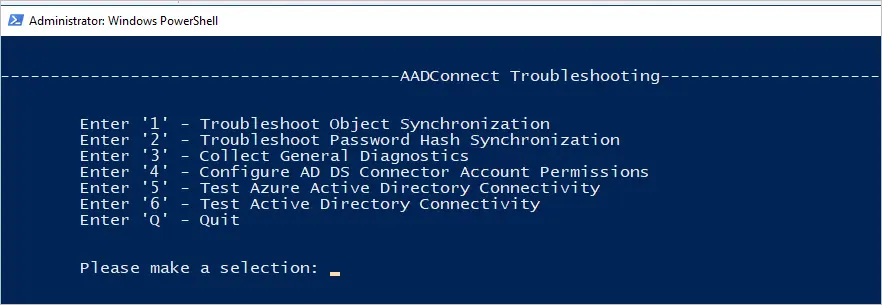
Pour plus d’informations, consultez l’article Microsoft Résoudre les problèmes de synchronisation d’objets avec la synchronisation Azure AD Connect.
3. Problèmes de connectivité Azure AD Connect
De nombreux problèmes de synchronisation peuvent être liés à un problème de connexion réseau. Voici les deux problèmes de connexion les plus courants.
- Connexion à Active Directory local (contrôleurs de domaine) : le serveur exécutant Azure AD Connect a besoin d’une connectivité complète à vos contrôleurs de domaine. Assurez-vous que les ports de pare-feu Active Directory suivants sont ouverts entre les serveurs.
- 53 (TCP/UDP)
- 88 (TCP/UDP)
- 135 (TCP/UDP)
- 389 (TCP)
- 445 (TCP)
- 49152 à 65535 TCP/UDP
- Connexion à Azure AD : le serveur qui exécute Azure AD Connect a besoin d’un accès Internet à diverses URL Azure et Microsoft. Reportez-vous au document URL et plages d’adresses IP Office 365 pour obtenir la liste complète.
Conclusion
Si vous avez de l’expérience avec Active Directory et Azure locaux, l’utilisation d’Azure AD Connect est assez simple. Si vous êtes novice en matière de ces technologies, cela peut être difficile. Nous espérons que ce guide vous a aidé à installer et à configurer Azure AD Connect et à synchroniser vos comptes locaux avec Azure.